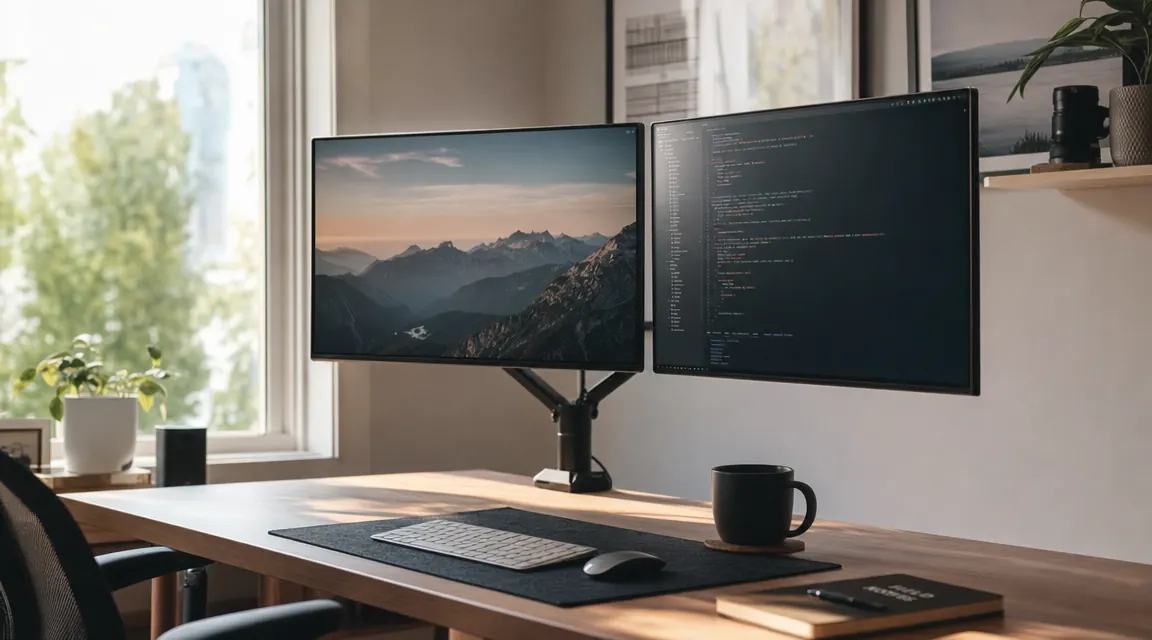
I resisted dual monitors for years because I thought the setup meant drilling holes through my desk or buying some industrial mounting rail that cost as much as the monitors themselves. Then I watched a coworker clip a single monitor arm onto the back edge of a standard IKEA desk in about 15 minutes and walk away with a two-screen setup that looked cleaner than most IT-managed office configurations. No holes. No permanent hardware. Just a C-clamp tightened by hand and an Allen wrench for the VESA bolts. That was the day I stopped overthinking it.
The barrier most home-office workers run into is not technical. It is not knowing where to start: which arm to buy, whether your desk can handle it, how thick a surface the clamp actually fits, and in what order to do things so you are not lifting a 15-pound monitor over your head while simultaneously trying to read an instruction pamphlet. This guide walks through all five steps in the order they actually matter, using the HUANUO Dual Monitor Stand as the reference tool. It supports screens from 13 to 32 inches, fits desks up to 3.9 inches thick, and costs a fraction of the premium alternatives. With 34,172 Amazon reviews and a 4.6-star rating, it is the most field-tested option in the category.
Your desk is probably thick enough, and this arm fits 96% of standard desk edges.
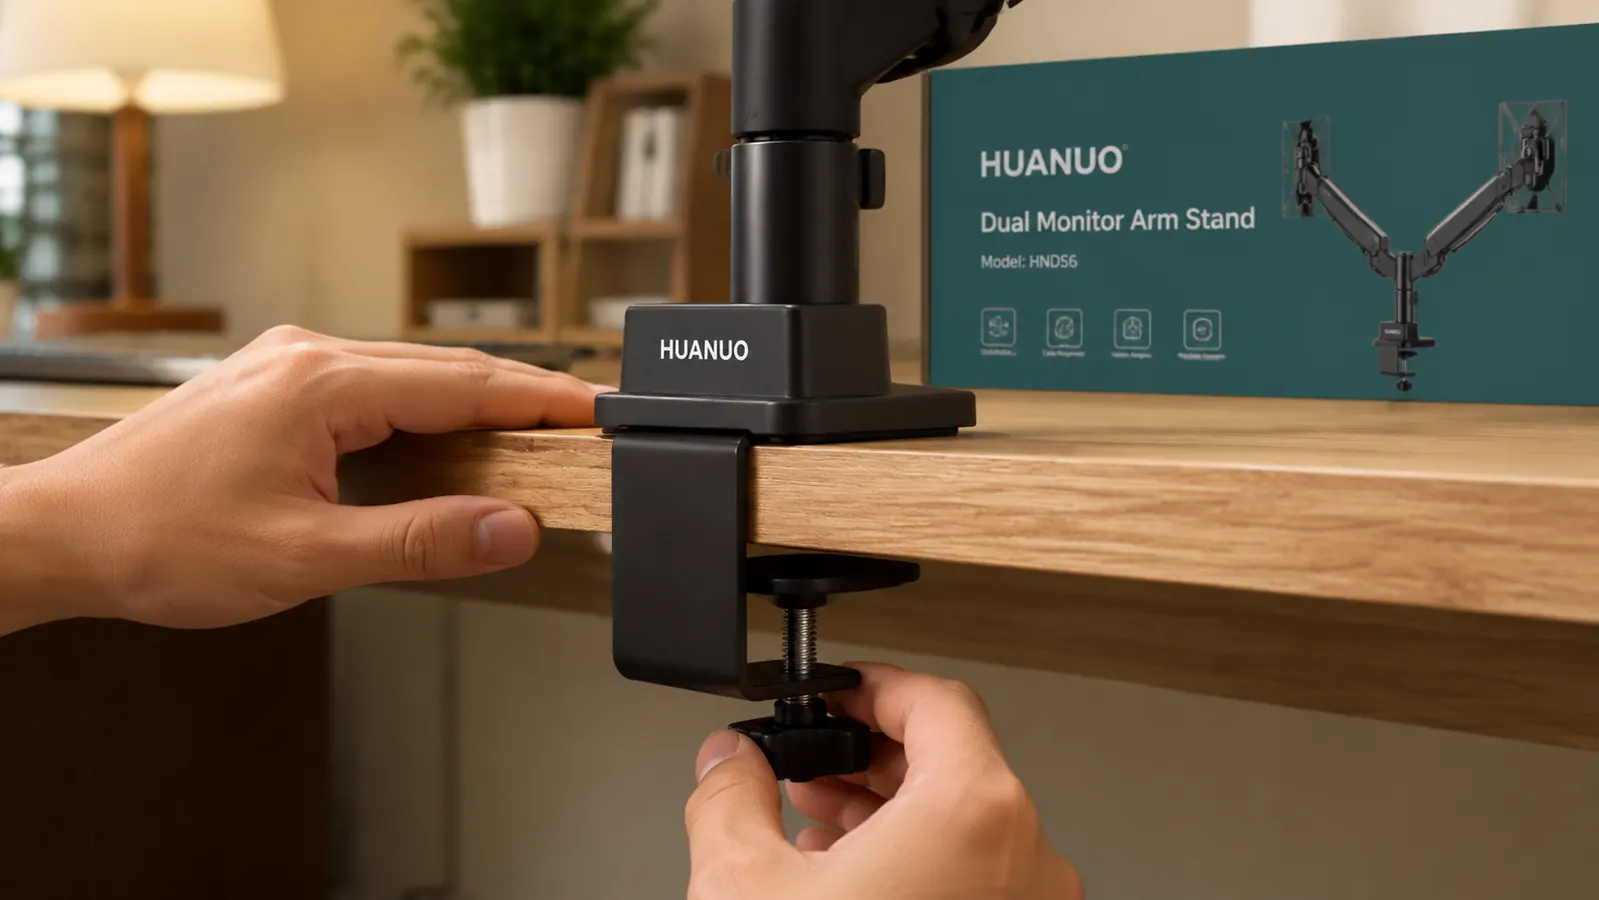
The HUANUO Dual Monitor Stand clamps onto desks up to 3.9 inches thick. No drilling, no grommet plate required. Over 34,000 buyers have installed it the same way you are about to.
Amazon Check Today's Price on Amazon →Step 1: Clamp the Mount and Check Your Desk Thickness
Before you unbox your monitors, figure out where the arm is going to live. Most C-clamp arms mount to the back edge of a desk, with the clamp jaw wrapping below the surface. The HUANUO clamp accommodates desk edges from 0.4 inches up to 3.9 inches thick. Grab a tape measure and check your desktop at the spot where you plan to mount. If you have a thick butcher-block desk or a solid-wood top over 3.9 inches, the grommet-mount base that ships in the box is your alternative: it drops through a pre-drilled hole (typically 2.5 to 3.5 cm in diameter) or one you drill yourself.
Once you know the clamp will fit, pick your exact mounting position. Center of the desk usually gives you the cleanest look, but if your keyboard and mouse sit to one side, offset the arm a few inches the other direction so both screens end up in front of you rather than angled. Slide the clamp bracket over the desk edge and hand-tighten the bottom knob until the rubber pads grip firmly. No tools needed at this stage. The rubber pads are important: they distribute the load and prevent the clamp from marring the desk surface, which matters both for your furniture and for getting a security deposit back if you are renting. Once hand-tight, give the whole arm a firm side-to-side push. It should not shift. If it does, tighten the knob another quarter turn.
Do not mount the arm flush against a wall behind your desk. You need several inches of clearance so the arm can tilt and swivel without hitting the baseboard or outlet covers. Eight to ten inches of clearance behind the mount point is comfortable. Also check that the desk is not positioned directly over floor heating vents or beside a window that swings open and would knock a monitor. Tedious to think about now, significantly less tedious than repositioning everything in three days.
Step 2: Attach Both Monitors Using the VESA Brackets
VESA is the mounting standard that makes monitor arms universally compatible with screens. Most monitors sold in the last decade have a VESA pattern of either 75x75 mm or 100x100 mm on their back panel, behind a removable plastic cover. Check your monitor's specs sheet or the sticker on the back before starting. The HUANUO arm ships with VESA adapter plates for both patterns, plus the bolts you need.
Lay your first monitor face-down on a folded towel or a soft surface. Remove the existing stand by unscrewing the base bolts, then peel back the plastic cover over the VESA mounting hole pattern. Thread the VESA adapter plate onto the monitor first, then lift the monitor and hang it on the arm's mounting bracket. Use the Allen wrench to tighten the locking bolt that secures the bracket to the arm. Do not fully torque it yet, because you will need to adjust the height and tilt in Step 3. Finger-tight plus a half turn is enough to hold the monitor safely while you continue. Repeat the same process for the second monitor on the second arm.
A common mistake at this stage is tightening the VESA bolts to full torque before the arm tension is calibrated. If the spring tension in the arm is set for a lighter monitor and you then mount a heavier one, the arm will slowly droop over the following days. Calibrate tension after both monitors are hung but before you fully lock the articulation joints.
Step 3: Set Eye-Level Height and Side-by-Side Spacing
Correct monitor height is the single biggest ergonomic lever in a dual-screen setup, and most people get it wrong in the same direction: too low. Sit in your normal working posture, look straight ahead, and note where your gaze lands. The top edge of each monitor should sit at or just slightly below that natural gaze line. This keeps your neck in a neutral position rather than angled down, which is what causes the slow-building neck and upper-back tension that feels like fatigue by 3 PM but is actually a posture problem.
Adjust the arm's vertical shaft to bring both monitors up to the correct height, then set the tilt to 10 to 20 degrees backward. Your viewing distance should be roughly arm's length from the screen surface. If you are finding you need to lean forward to read text comfortably, that is a font-size issue, not a distance issue. Fix it in your OS display settings rather than pushing the monitors closer, which increases neck strain.
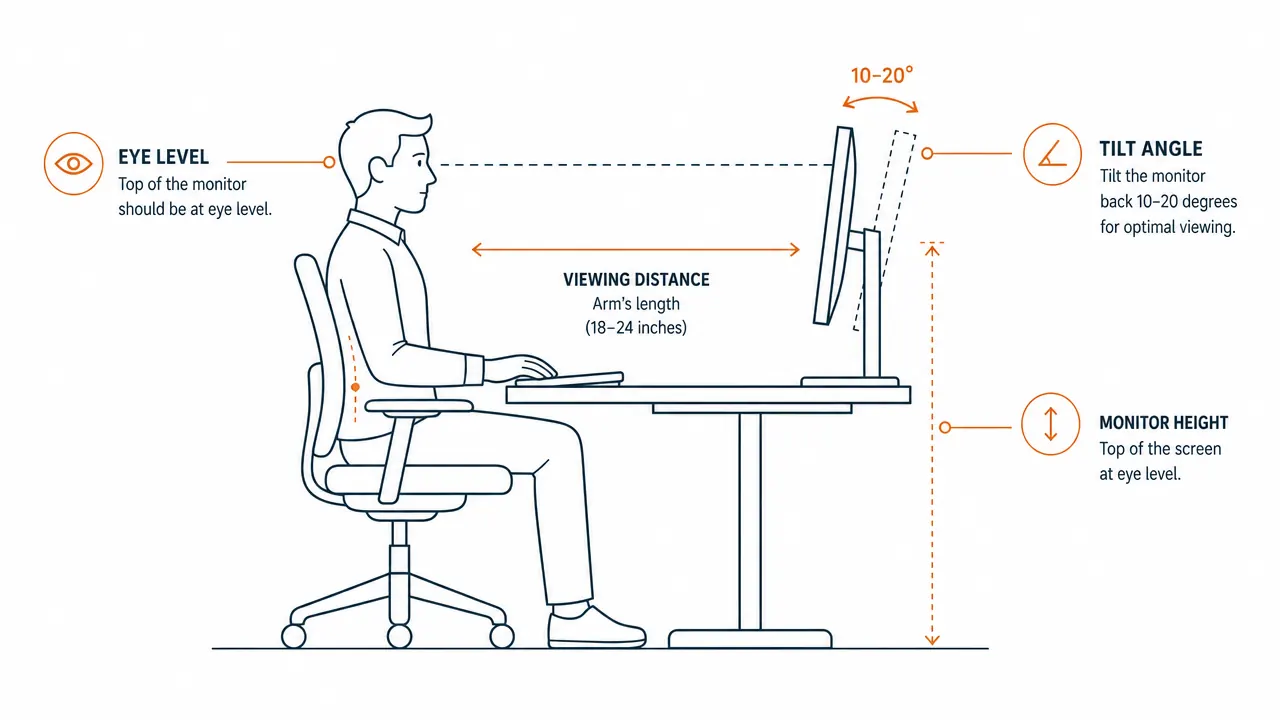
For the horizontal spacing between the two screens, aim for a gap of about one to two inches. Close enough that your eye does not lose the cursor when moving between screens, wide enough that the bezels do not feel claustrophobic. If you have a primary and a secondary screen workflow (main work on the left, reference material on the right, for example), angle the secondary monitor inward by 15 to 20 degrees so it faces your natural sightline when you glance right. The HUANUO arms swivel independently on their VESA brackets, so this is a matter of rotating the mount while the arm is in position.
Step 4: Route the Cables
Cable management is the difference between a dual-monitor setup that looks professional and one that looks like a networking closet exploded. The HUANUO arm has a channel along the central spine and slots at each arm joint designed to guide cables from the monitor down to the desk surface. Use the velcro straps that ship in the box to bundle your DisplayPort or HDMI cable together with the monitor's power cable, then run both through the spine channel before tucking them behind your desk.
Plan your cable routing before you finalize the arm's position. The goal is a single cable bundle that exits the arm at the base, drops straight down behind the desk, and connects to your computer or a powered hub without crossing open desk space. If your desk sits against a wall, a cable management clip or adhesive cable tray on the back of the desk catches the bundle cleanly. If the desk floats in the room, route the cables down the back leg of the desk and velcro them to the leg itself so they do not swing freely.

Step 5: Align Arm Tension, Tilt, and Display Arrangement in Your OS
With both monitors mounted and cables routed, do a final arm-tension check. Most dual monitor arms have a tension adjustment bolt near the base of each arm, accessible with the included Allen wrench. The correct tension setting is one where the arm holds position when you let go but still moves smoothly when you push it. If the arm drifts downward under the weight of the monitor, the tension is too loose. Turn the tension bolt clockwise in small increments until the arm holds. If the arm resists movement enough that you feel like you might break something, back off a quarter turn.
On the software side, your operating system needs to know the physical layout of your two screens so that moving the mouse off one edge correctly picks up on the other screen. On Windows 11, go to Settings, then System, then Display. You will see two numbered rectangles representing your monitors. Drag them into the arrangement that matches your physical setup, left screen on the left, right screen on the right, and if they are at slightly different heights in real life, match that in the software too. On macOS, go to System Settings, then Displays, then Arrangement. Drag the white menu-bar indicator to the screen you want as your primary. Click Detect Displays if your second monitor is not showing up. On either platform, confirm the refresh rate and resolution settings match the monitor's native specs rather than defaulting to a lower setting.
Once the OS arrangement is set, open a window and drag it from one screen to the other. The cursor should track intuitively. If moving the mouse off the top of the left screen puts you on the bottom of the right screen, your display arrangement in software does not match physical reality. Go back into display settings and adjust the relative vertical positions of the two screen icons until the behavior matches. This takes two minutes and eliminates the most common post-installation frustration.
What Else Helps
A dual monitor arm solves the physical setup problem, but a few companion choices close the loop on a genuinely comfortable dual-screen workday. A USB-C hub or a KVM switch that handles two display outputs simplifies the cable situation on the computer side, especially if you switch between a laptop and a desktop. A cable tray mounted under the desk catches the slack from both monitor cables and keeps the floor clean. And if you find that the two monitors do not match in color temperature, most modern screens let you dial the Kelvin value up or down in their on-screen display menu. Match both to around 5500K during the day and step them down to 4000K in the evening if you work late. Your eyes will thank you by hour six.
The whole job is under 30 minutes if you read through the steps once before picking up a tool. Most of the time goes into cable routing, not the mounting itself.
The arm that makes all five steps possible costs less than a single monitor cable management box.
The HUANUO Dual Monitor Stand supports screens from 13 to 32 inches, clamps to any desk up to 3.9 inches thick, and ships with every bolt and Allen wrench you need. No drilling, no permanent installation, and no specialist required.
Amazon Check Today's Price on Amazon →